
Is your browsing experience on Google Chrome becoming sluggish? how to clear cache on google chrome. The cache is a collection of temporary files stored by your browser to speed up page loading. However, an overloaded cache can slow down your browsing and impact performance. Clearing the cache on Google Chrome is a simple yet effective way to boost speed and improve overall performance. In this comprehensive guide, we will walk you through the process of clearing the cache on Google Chrome, empowering you to reclaim a faster and smoother browsing experience.
Why Clear the Cache?
Clearing the cache offers several benefits:
- Improved Performance: Over time, the cache can accumulate a significant amount of data, leading to slower page loading times. Clearing the cache frees up valuable resources and allows web pages to load faster.
- Updated Content: Clearing the cache ensures you always see the latest version of websites. It prevents outdated or cached content from appearing, providing you with the most up-to-date information.
- Fixing Display Issues: In some cases, a corrupted cache can cause display issues, such as missing images or broken layouts. Clearing the cache can resolve these problems and restore the proper display of web pages.
Step-by-Step Guide to Clear Cache on Google Chrome
Follow these simple steps to clear the cache on Google Chrome:
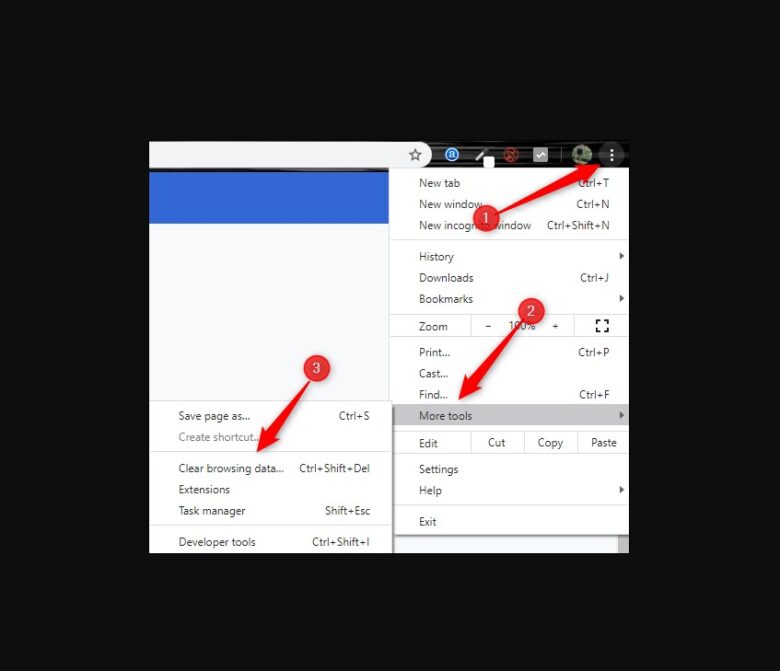
Step 1: Open Chrome Settings
- Launch Google Chrome on your computer.
- Click on the three vertical dots located at the top-right corner of the browser window.
- From the dropdown menu, select “Settings.”
Step 2: Access Privacy and Security Settings
- Scroll down the settings page and click on “Privacy and security” in the left-hand menu.
Step 3: Clear Browsing Data
- Under the “Privacy and security” section, click on “Clear browsing data.”
Step 4: Customize Data to be Cleared
- In the “Clear browsing data” window, ensure that the checkbox next to “Cached images and files” is selected.
- You can also choose to clear other types of data like browsing history, cookies, and more, based on your preferences.
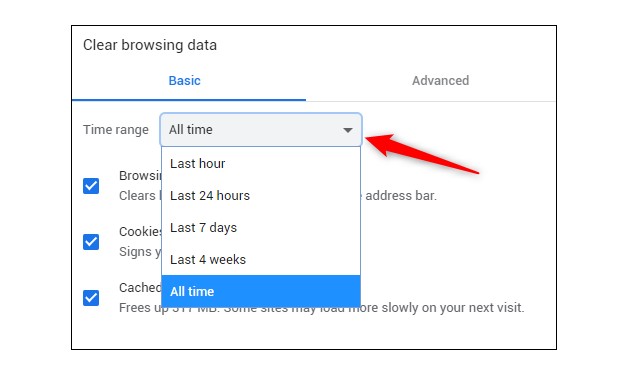
Step 5: Select Time Range (Optional)
- If you prefer, you can select a specific time range for clearing the cache. Options include the past hour, day, week, or you can choose “All time” to delete the entire cache.
Step 6: Clear Cache
- Once you have made your selections, click on the “Clear data” button to initiate the clearing process.
Step 7: Restart Chrome
- After Chrome finishes clearing the cache, it is recommended to restart the browser for the changes to take effect.
Conclusion:-
By following these steps, you have successfully cleared the cache on Google Chrome. Congratulations! Now you can enjoy a faster and smoother browsing experience. Web pages will load quicker, and you’ll have access to the most recent content.
Remember to periodically clear your cache to maintain optimal performance. Additionally, consider optimizing other aspects of your browser, such as disabling unnecessary extensions and regularly updating Chrome to ensure the best browsing experience.
Clearing the cache on Google Chrome is a simple yet powerful technique to boost performance. Take control of your browsing experience today and enjoy the speed and efficiency you deserve!